How Hard Is Face Detection?
Lately, I’ve been playing around with computer vision libraries in Python. As a little experiment, I wanted to see how hard face detection is in 2026. The answer, it turns out, is: it depends entirely on whether your subject is wearing sunglasses.
This is a tour of a Jupyter notebook I put together using OpenCV, MediaPipe, and YOLO. It is not a triumphant tutorial. It is a record of what actually happened — including the part where the algorithm confidently identified a hand as a face.
The Setup
import cv2 as cv
import matplotlib.pyplot as plt
from IPython.display import Image
import mediapipe as mp
from mediapipe.tasks import python
from mediapipe.tasks.python import vision
from ultralytics import YOLO
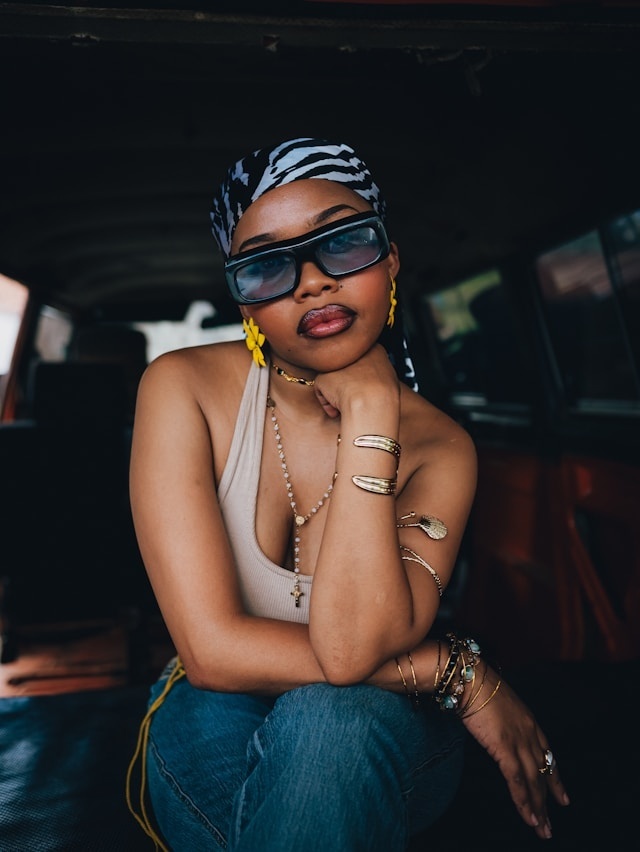
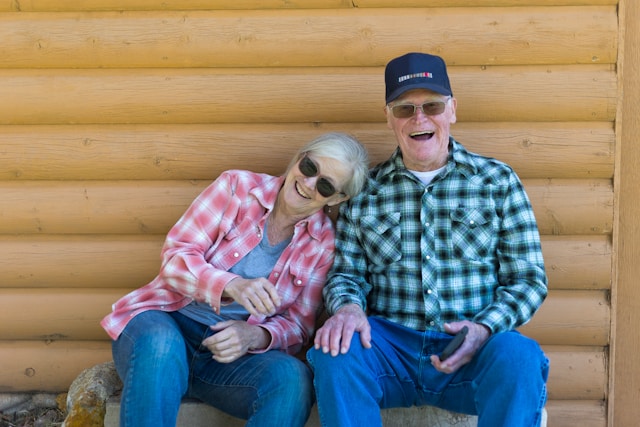
%matplotlib inlineThree test images: a woman in sunglasses sitting in a car (photo by Michael Kyule on Unsplash), an older couple in front of a log cabin (photo by Land O’Lakes, Inc. on Unsplash), and a group BBQ photo of me and some family. All reasonable photos. All, it turns out, adversarial inputs in their own way.
OpenCV loads images in BGR format but matplotlib expects RGB. You’ll see this everywhere:
plt.imshow(cv.cvtColor(image, cv.COLOR_BGR2RGB))The [:, :, ::-1] trick you might see elsewhere does the same thing but is harder to read. Use cvtColor — your future self will thank you.
First Attempt: Haar Cascades
The obvious starting point. Haar cascades have been in OpenCV forever, they require no extra installs, and every tutorial on face detection mentions them first.
You do need to download the classifier XML file first:
urllib.request.urlretrieve(
    "https://raw.githubusercontent.com/opencv/opencv/master/data/haarcascades/haarcascade_frontalface_default.xml",
    "haarcascade_frontalface_default.xml"
)woman_image = cv.imread("woman.jpg")
gray_woman = cv.cvtColor(woman_image, cv.COLOR_BGR2GRAY)
face_cascade = cv.CascadeClassifier("haarcascade_frontalface_default.xml")
faces = face_cascade.detectMultiScale(gray_woman, scaleFactor=1.1, minNeighbors=2)
for (x, y, w, h) in faces:
cv.rectangle(woman_image, (x, y), (x+w, y+h), (0, 255, 0), 2)
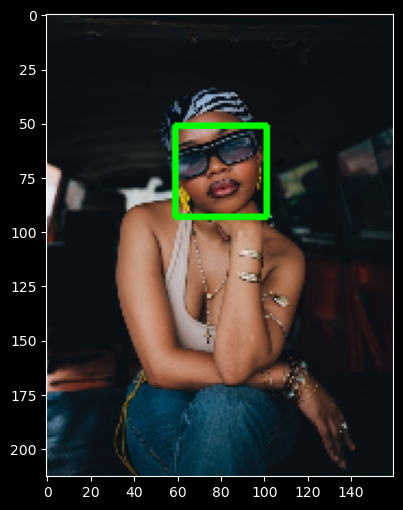
plt.imshow(cv.cvtColor(woman_image, cv.COLOR_BGR2RGB))The result: a confident green rectangle around the woman’s hand.
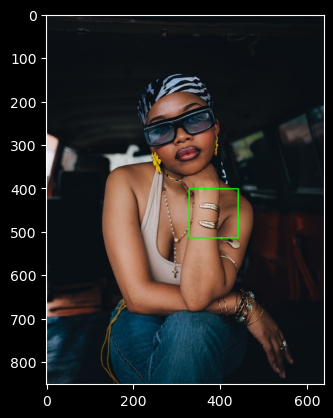
Not her face. Her hand.
This is not a bug, exactly. Haar cascades work by scanning the image for patterns of light and dark rectangles that statistically correlate with faces. They were introduced in 2001 and they were impressive in 2001. The problem is that they have no concept of what a face is — they only know what patterns tend to appear in face-shaped regions. Her jewelry, the shadows on her hand, the contrasting skin tones — all of it accidentally assembled into something that looked, to a 24-year-old algorithm, like a face.
The sunglasses made things worse. Eye detection is the backbone of Haar frontal face detection. Cover the eyes, and the signal degrades badly. Raising minNeighbors to 5 to filter false positives: detected nothing. The tightrope between false positives and false negatives is unforgiving here.
Haar cascades still have legitimate uses — extremely resource-constrained hardware, controlled environments with consistent lighting and angle, quick prototypes where you just need something. But for real-world images with real-world variation, they’re the wrong tool.
MediaPipe: The Right Tool
MediaPipe’s BlazeFace model is what you actually want for face detection in the real world. Start by downloading the model:
import urllib.request

urllib.request.urlretrieve(
    "https://storage.googleapis.com/mediapipe-models/face_detector/blaze_face_short_range/float16/latest/blaze_face_short_range.tflite",
    "detector.tflite"
)mediapipe.solutions API, which looks different from this. This code uses the newer Tasks API (mediapipe.tasks.python), which requires downloading a .tflite model file separately rather than using a bundled model. That’s the reason for the urllib.request step above.base_options = python.BaseOptions(model_asset_path='detector.tflite')
options = vision.FaceDetectorOptions(base_options=base_options,
min_detection_confidence=0.5)
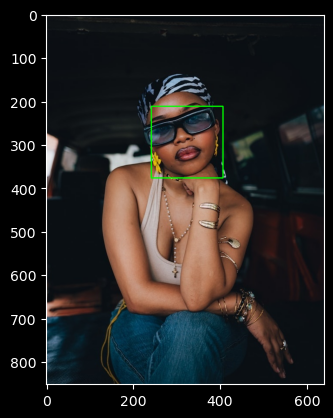
with vision.FaceDetector.create_from_options(options) as detector:
mp_image = mp.Image(image_format=mp.ImageFormat.SRGB,
data=cv.cvtColor(woman_image, cv.COLOR_BGR2RGB))
results = detector.detect(mp_image)
for det in results.detections:
bbox = det.bounding_box
cv.rectangle(woman_image,
(bbox.origin_x, bbox.origin_y),
(bbox.origin_x + bbox.width, bbox.origin_y + bbox.height),
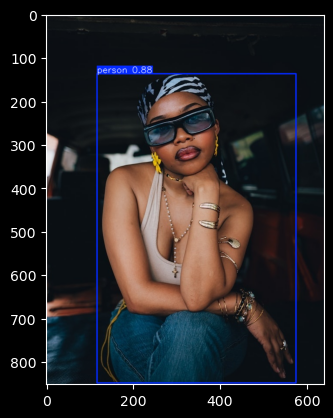
(0, 255, 0), 2)This detected the woman’s face correctly. You’ll see GL version logs in the output — those are informational, not errors.
Once the basic detection worked, the natural next step was wrapping it in a reusable function:
def find_faces(image, confidence_threshold=0.5):
    output = image.copy()  # writable copy — important
    base_options = python.BaseOptions(model_asset_path='detector.tflite')
    options = vision.FaceDetectorOptions(base_options=base_options,
                                          min_detection_confidence=confidence_threshold)
    with vision.FaceDetector.create_from_options(options) as detector:
        mp_image = mp.Image(image_format=mp.ImageFormat.SRGB,
                            data=cv.cvtColor(output, cv.COLOR_BGR2RGB))
        results = detector.detect(mp_image)
        for det in results.detections:
            bbox = det.bounding_box
            cv.rectangle(output,
                         (bbox.origin_x, bbox.origin_y),
                         (bbox.origin_x + bbox.width, bbox.origin_y + bbox.height),
                         (0, 255, 0), 2)
    plt.figure(figsize=(8, 6))
    plt.imshow(cv.cvtColor(output, cv.COLOR_BGR2RGB))
    plt.show()
The image.copy() is not optional. OpenCV will crash with a read-only array error if the image was loaded with plt.imread() instead of cv.imread(). Making a copy inside the function also means calling find_faces twice won’t stack rectangles on the same image.
A related gotcha: load all images with cv.imread, not plt.imread. They look interchangeable but they’re not — cv.imread returns BGR, plt.imread returns RGB. If you mix them and then run cv.cvtColor(image, cv.COLOR_BGR2RGB) on a plt.imread image, you’re flipping RGB to BGR instead of fixing it. The colors come out wrong, the detector gets corrupted input, and there’s no error message telling you why.
The Confidence Threshold Problem
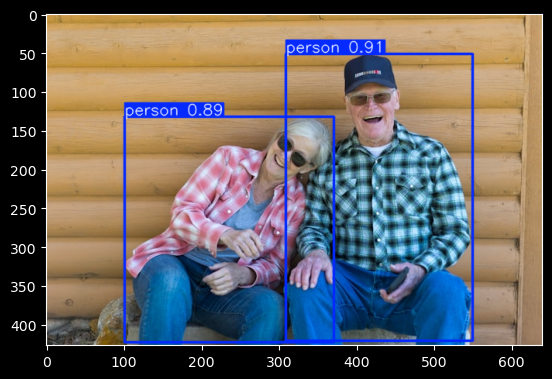
The couple image is where things got instructive — and where a silent bug wasted a lot of time. I tried every threshold combination I could think of before realizing the problem had nothing to do with thresholds: I’d loaded the image with plt.imread instead of cv.imread. Running cv.cvtColor on an already-RGB image flips it to BGR, corrupting the detector’s input with no error message. Zero detections, no explanation.
Once both images were loaded consistently with cv.imread, 0.5 confidence worked fine — it found the man’s face cleanly and the bottom part of the woman’s face. The man was never the problem; the woman’s face, tilted and half-obscured by sunglasses, is what the model struggled with throughout.
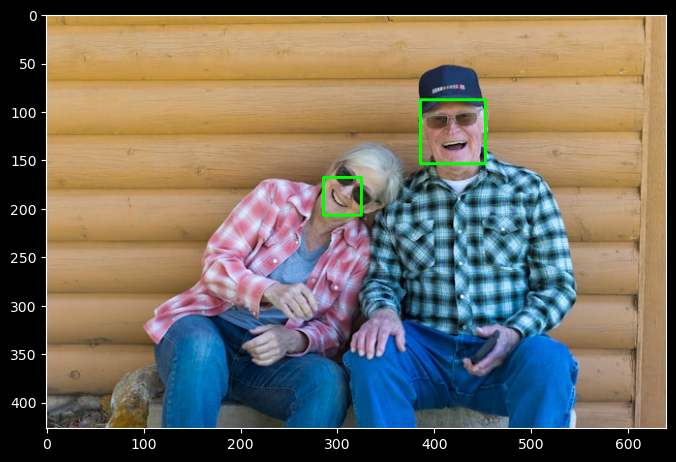
The lesson: check your imports before tuning your thresholds.
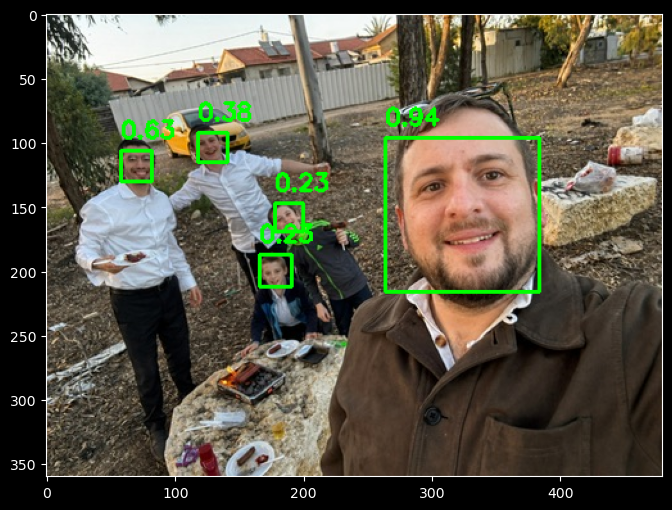
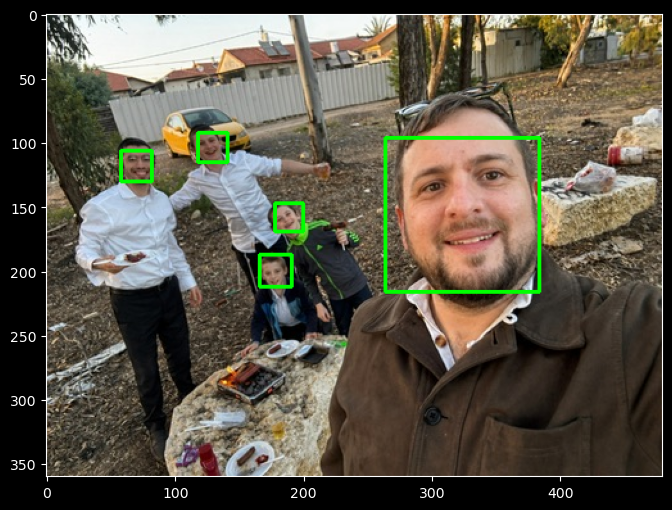
On the BBQ image — me and some of the kids — the model returned only two detections at 0.5. Lowering to 0.2 found all five. This is what working threshold tuning looks like: the faces are present and detectable, just smaller and less prominent. The couple image was the harder case — no amount of threshold tuning helps when the face geometry is genuinely outside what the model can see.

Adding Confidence Scores to the Output
At this point it made sense to display confidence scores on the rectangles, the same way YOLO labels its detections. The function grew a score line and a cv.putText call:
for det in results.detections:
    bbox = det.bounding_box
    score = det.categories[0].score
    cv.rectangle(output,
                 (bbox.origin_x, bbox.origin_y),
                 (bbox.origin_x + bbox.width, bbox.origin_y + bbox.height),
                 (0, 255, 0), 2)
    cv.putText(output,
               f"{score:.2f}",
               (bbox.origin_x, bbox.origin_y - 10),
               cv.FONT_HERSHEY_SIMPLEX,
               0.6, (0, 255, 0), 2)
The -10 y offset places the score just above the rectangle rather than overlapping it.
Resolution Optimization
For video detection, you want the smallest image that still produces reliable detections. Processing 1080p at 30fps is expensive; processing 320x240 is not. To find the minimum viable resolution, test across a range while maintaining your aspect ratio:
original_height, original_width = woman_image.shape[:2]

for target_width in [640, 480, 320, 240, 160]:
    target_height = int(original_height * target_width / original_width)
    resized = cv.resize(woman_image, (target_width, target_height))
    # run detection on resized...
    print(f"{target_width}x{target_height}: detected {len(results.detections)} face(s)")
The one just above where detection fails is your optimal size.
YOLO: Person Detection
YOLO (yolov8n.pt) auto-downloads on first use and detects whole people rather than just faces — it’s trained on the COCO dataset, which includes 80 object classes including person. For the couple image it returned 0.91 and 0.89 confidence on both people; for the woman alone, 0.88. Both images, both detections, no confusion about hands.
The practical difference: if you need to know where faces are (identity verification, emotion detection, gaze tracking), use MediaPipe. If you need to know whether people are present (crowd counting, motion detection, occupancy), YOLO is the better fit.
model = YOLO('yolov8n.pt')  # auto-downloads; load once outside any loop

def find_people(image):
    results = model(image)
    plt.figure(figsize=(8, 6))
    plt.imshow(cv.cvtColor(results[0].plot(), cv.COLOR_BGR2RGB))
    plt.show()

find_people(woman_image)
find_people(folks_image)
find_people(bbq_image)
Loading the model inside the function works but reloads from disk on every call. In a loop over video frames, that cost adds up fast.
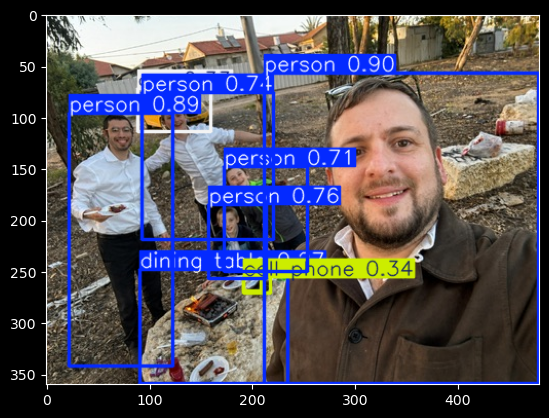
One thing I genuinely enjoyed about YOLO: it detects everything in the frame, not just faces. The BBQ image came back with people, chairs, food — and also a rock labeled “dining table” at high confidence, and a plate labeled “cell phone” at low confidence. It’s hard not to find that charming.
What I Learned
Haar cascades are worth understanding as a historical baseline — they explain why modern approaches work differently. But for anything real-world, they’re the wrong tool. A 24-year-old algorithm trained on rectangular pixel patterns has no business near a photo with jewelry, shadows, and sunglasses.
MediaPipe’s BlazeFace is fast, handles real-world variation well, and works correctly once you get past the versioning issues and the BGR/RGB trap. The confidence threshold is a real parameter you have to tune per image context — 0.5 is a starting point, not a guarantee. For faces it can actually see, it works well. For faces that are heavily occluded or at extreme angles, no amount of threshold tuning will help.
For detecting whether people are present at all, YOLO is more robust — it’s looking for bodies, not faces, so pose and occlusion matter less.
Photo credits: Michael Kyule on Unsplash (woman image). Land O’Lakes, Inc. on Unsplash (couple image). BBQ image: personal.